Saturday, September 14, 2013

Thinking Inside the Box!

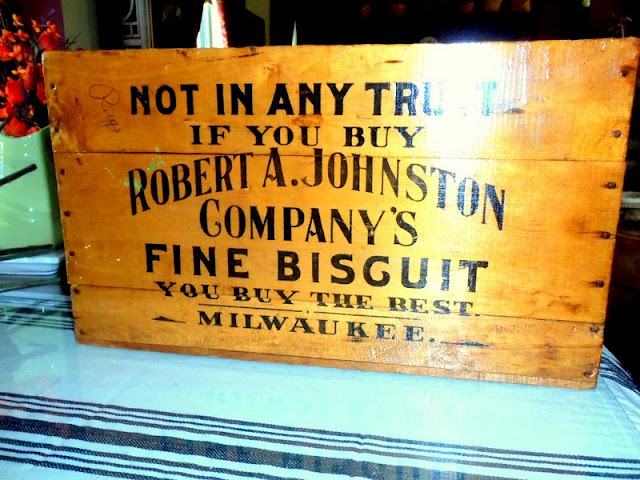
Hi Everyone!  A few weeks back, I popped into one of my favorite antique malls, and walked out with this wonderful old packing box.  It was in wonderful shape, the graphics were awesome and I love the inky blue label on one of the sides.


I did a little research and found the company started out in the 1800's and are still in business today, now making ice cream toppings.  If you are interested in a little Robert A. Johnston Company history, you can check that out here.


I just love that the label is still basically intact!


Both long sides say the same thing.  Fascinating that it claims not to be part of any trust, as being a part of trust back then was frowned upon.


The label on the other short end is my favorite - I don't know why.  I think it is the actual cursive handwriting by some long ago quality control guy or gal that intrigues me.  So quaint.

So, what to do with this box? It kind of sat pushed aside in our family room for several weeks until I went to JoAnn's to get some supplies for another project.  I came across the most wonderful fall florals and knew I had to use them in this box! (at least for now!)


Two of the flowers were made from burlap and have French writing on them....there was a big crowd around these flowers when I was at the store, so I was grateful to have grabbed the two I did!


Here one is up close and personal - so cute!


I also selected three very large flowers - one in reddish orange, one in a lime green, and finally, one in a golden yellow.  Perfect with the colors in my family room - see how they complement the pillow in the background? I just love these!


I rounded out my purchase with a few other basic stems, added some I already owned, and finally plopped a raffia pumpkin in for a touch of fall. 

We have a landing half where up our staircase, where the stairs take a jog, and there is a ledge for décor  also.  I have never - in all of the ten plus years we've lived here - been happy with anything I have decorated this space with.  Don't know - it is just a constant nemesis! For now, I put my box and a wood/iron piece I have used in many different rooms over the years - also something that I love, but have never been happy with any place it has called "home."  (it is one foot out of here, I think, because it just never looks right! Have you ever bought something you loved, but it never really worked in your house?)

But, anyway, here is both of their homes for the moment.  The iron piece adds some needed height and a pop of color behind the stained box.  I like it - just not in love.  The box, however, is a keeper - looking forward to using it many ways!


So, that's me thinking inside the box today! Thanks for stopping by. 
 
Jane
 
 
Joining in these fun parties:


Monday, September 9, 2013

Costs & Sources for Our Kitchen Reno

Hi Everyone!

Warning: This is a long post!!! Thought I would share with you all the details of our kitchen re-do.  Although not truly a budget project per se, it was done with cost in mind.  The biggest hurdle in all this was convincing Mr. Bluebird that painting our out of date oak cabinets was a good thing! You know, the age-old man mindset that wood should never be painted.  I had been longing for a white kitchen for years & years, but to no avail. When the time came to re-do our kitchen, I mentioned that I would be happy keeping our old cabinets if they were painted - his eyes glazed over at saving all that money new cabs would cost and he said "go for it!"  In the end, he is more over the moon for the look of these cabinets than me - and I am pretty happy about them!

And now - with no further ado, here is how we spent our money:


Cabinet painting:  $2,100

done by our painting contractor

Benjamin Moore - Subtle

2 coats oil-based primer
2 coats BM Impervo oil paint
*the process took 5 days to complete

I spent months and months buying little sample pots of every imaginable white.  This was our toughest decision by far, but worth the time and effort.  I am so happy with this color.  My suggestion to you is that if you are planning on painting your cabinets white is to buy those sample pots and make large posters with the paint to hang around your room.  So many that I thought would be perfect were either too yellow, too green, too gray, too blue, etc., etc. - yet on the paint strip it looked fantastic.  Once I narrowed down to a few, I painted on scrap oak to see what it would look like on the surface that would be painted.


Flooring:  $3,164

installed by our flooring contractor

Mannington Revolutions Tile Oasis Laminate - Palermo Firestone


Granite:  $3,440.00

installed by our granite contractor

Black Pearl


3 Drawer Cabinet, 2 Appliance Garages:  $462/$140

installed by Mr. Bluebird

Merrillat Essentials Millbridge II -

BD303D  30" 3- Drawer Base Cabinet
Appliance Garage Tambour Straight 30"
Appliance Garage Tambour Straight 18"

Wine Rack:  $109

custom made locally
installed by Mr. Bluebird

Preparation/Glass Install in Cabinet Doors:  $126.00/$44.00

removal of inner wood panel & prepare 4 doors to accept glass - locally done
installation of Winterlake decorative glass - locally done (yes! only $44.00 for all - a steal!)


Lighting Over Sink:  $58.00

Allen & Roth Edison Mission Bronze Mini Pendant/Lowes


Lighting Over Kitchen Table:  $159.00

Portfolio 2-Light Antique Bronze Hanging Pot Rack/Lowes


Interior Cabinet Lighting & Rope Lighting Above Upper Cabinets:  $112.00

Mr. Bluebird did all the electrical installation

Beadboard Panels (added to exposed sides of all cabinets):  $75.00

Mr. Bluebird did the installation - cost of materials only

Additional Cabinet Hardware & Supplies:  $40.00

Since I still loved our original cabinet hardware, we simply purchased the additional drawer pulls we needed (6), and I spray painted everything (actually, my painting contractor did this while he was waiting for some material to be delivered! Smiles!)
 
 
Wall Paint:  $68.00
 
Behr Premium Plus Ultra in Merlot, 2 gallons & 4 coats! (dark shades, I have found, need multiple coats to achieve their true color - especially anything red based)
 
Not gray, not greige, not blue - what can I say? I like what I like and had to stay true to me! Love those colors in others homes - gorgeous - but just not me and I know I would not be happy with them for long. So, merlot we go!
 
We did the painting ourselves.


Spice Drawer Organizer:  $30.00
 
Container Store Expand A Drawer #221090
 
*The best $30 I've ever spent - I love this thing!!!


Along the way, we had other, incidental costs, but these are the big items that made up our kitchen renovation.  Also, we had just purchased a new sink & faucet several months before we decided to take on this project, so I did not include that cost - which would have added on another $300 or so.  We purchased our stainless steel appliances about 18 months prior to the remodel which also would have added another $3,000 to the bottom line.  While we did a lot of work ourselves, we hired out the cabinet painting, granite install, and flooring install.  Mr. Bluebird was in recovery from back surgery at the time, and while he could have done the flooring install himself, he was not in any condition to do so. Had we done the cabinet painting and flooring installation ourselves, the cost would have probably been reduced by 40 to 50%.
 

Total Cost:  $10,127.00

 
We spent a lot of time getting multiple estimates from contractors, looking for products, etc.  That was time well spent as we are thrilled with the end result.  We feel we got the most our money could buy.  While not a designer kitchen, it is perfect for us.  Had we gone with a complete gut job, we would have far exceeded $35,000, we had contemplated this option and even had a few estimates on doing so.  Although we had the budget to do this, here are few things that kept us from doing so:


1.  The basic layout of the kitchen could not be changed without adding on to the house
 
2.  The kitchen layout worked for us with the exception of the desk area.  With a little research and
      less than $500, we were able to remedy that.  The original cabinet style by Merillatt was still
      available so we replaced the space wasting desk with a roomy 3 drawer unit, that also
      increased our usable counter space by 30 inches!  We also installed the appliance garages
      to camouflage some of the counter clutter which was always annoying to me! :)
 
3.  The cabinets themselves were wood and in perfect condition.  With a few added details that
      we were able to do ourselves before painting such as adding beadboard and molding, their
      entire look was changed for little $$$.  Adding the glass to some of the doors, along with
      interior lighting further upgraded our kitchen for little money.
 
So with these minimal changes with maximum impact, we decided to save ourselves some mega dough and go with the changes we did.  Happy! Happy!
 
 
Hope you found some of this info and insight useful!  Have a great day!
 
Thanks for stopping by,
 
Jane


Sunday, September 8, 2013

Kitchen Reveal - At Last!


Hi everyone!  I am finally going to reveal our kitchen remodel that we completed last fall!!!! To say I am late in this reveal is an understatement, but better late than never right?
 
We built our home in 2001 and we do love it.  Of course, our family was young and we were saving for braces, dance lessons, and college so some of the finishes were "just ok,"  Fast forward to 2012 - our one and only child was in her fourth year of college, most of the child raising bills had long been paid, and we were ready to make some interior upgrades.  It was fun having contractors do most of the work - Mr. Bluebird was recovering from major back surgery at the time, so he was limited on what he could do. Normally, this would have been a do it yourself job.  Throughout most of the reno, I was down and out with pneumonia - we were a hot mess of a couple, I'll tell ya! But in the end, we wound up with a beautiful to us kitchen!
 
I don't have too many shots of the kitchen "before," but I did manage to scrounge up one from Christmas 2011.  That's Mr. Bluebird to your right - looking deep in meditation! As you can see, it was a basic builders kitchen - golden oak cabinets, very plain.  By this time we had just upgraded  to stainless steel appliances and we had also installed our tumbled marble tile - both stayed during the renovation, along with the cabinets.
 
You can see the beginning of our reno here and here.


 Here is a similar view today. As you can see, we had the cabinets painted white and the walls are painted a merlot.  Obviously, with the wall color I went against the current trend of greys and blues - I almost went that way, but with a lot of soul searching I knew it was just not me, and I chose a color that I return to again and again in my décor. We also had granite installed throughout.  Originally the snack counter came out about ten inches further to accommodate stools, but this always messed up the placement of our kitchen table, resulting in the light fixture being off center.  So, I had them shorten things up and we have not missed this little sliver of counter, but have loved having the table placement corrected!


We also replaced a space wasting desk cabinet in this area and purchased a deep, three drawer base cabinet in its place - the greatest decision EVER! Oh how I love those drawers! When we built the house we had the desk put in so that the computer could be in the kitchen and we could watch over our then fifth grade daughter! Well, daughter is almost twenty three and with laptops and tablets, who needs all that kitchen space dedicated to computers? Not this girl!  We did have a tambour doored appliance garage put in to conceal the cell chargers, incoming packages, odds and ends - a quick close of the door, and presto! It looks clean & tidy - although clearly, it is not!


Here's that same area looking all kinds of orderly. If you note on the side of the appliance garage to the right, there is beadboard.  We installed beadboard on all the side panels of the cabinets and on one backsplash area of the kitchen to give it a farm house feel. The sides were just smooth oak and kind of blah.  The beadboard gives it some charm.
 

On this side of the kitchen, we had four of the doors cut out and outfitted with a specialty glass called Winterlake - beautiful. And when the cabinet lights are on, it gives such a cozy feel.  We also installed another smaller appliance garage in this corner to house the Keurig, can opener, and a few other necessities.  I don't like a lot of small appliances out on the counters, but since they are a necessity, this seemed like a good solution for us.


Here's a look at that corner with the tambour door open - Keurig, etc. easy to use, but stored out of the way most of the time.  We replaced all of the original lighting with farmhouse style fixtures.  I will post info on all of the products we used another day. Looking out the window, you can see our beautiful new pavilion that we had installed this summer.


A view of the eat-in area.  The light fixture is one of the favorite things we did in the kitchen.  Since purchasing this I have seen it crop up at several other bloggers' homes.  Also,  you can see in the background the Packer/Giants football game is on - sadly, the Pack did not win this week!!! Boo!


Before the reno, we had a funny little vacant space here, so we had a wine rack custom made - it was a simple little add on that really packs a lot of visual punch.


A close-up of the tumbled marble back splash Mr. Bluebird installed several years ago.  Would I have chosen something different if this was not already installed? Probably, but I do still like it and since it is very neutral, I am happy to keep it.


Since my original spice cabinet was lost when I decided to have glass put in the door, I found this awesome spice drawer organizer, and truthfully, I like it so much better - easy to see what I have at a glance.


So, there you have it - our little kitchen reno.  Hope you enjoyed the tour! I will share some of my sources and the total cost to complete, if any one is interested.  The bottom line is this: the original footprint of our kitchen worked for our family (with the exception of the desk area), the cabinets were good quality but outdated.  We were able to work with what we had to get a new, up to date kitchen for a fraction of what it would cost to start from scratch.  (We also had the floors replaced - that will have a future post of its own, as it is a lengthy tale!)
 
We love the transformation and would not change a thing in the choices we made.  That, to me, is success!
 
*Just put up the cost & source details post - check it out if you are interested.
 
Thanks for stopping by,
 
Jane
 
Linking to this fabulous & fun parties:


Saturday, September 7, 2013

Changin' Things Up in the Family Room

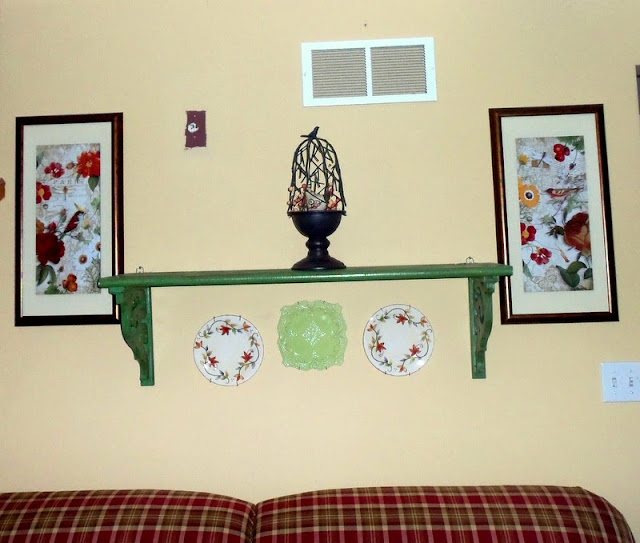
I came across some cute prints at Home Goods awhile back and knew they would be perfect in our family room.  There is a very awkward "sort of a wall" in this room, that also boasts a return air grille! Ugh!  But I plug on, as it can't be covered.  I have been on the lookout for a vintage grille to put there, and have come close a few times, but still on the hunt. That burgundy blob is where our former surround speaker had been - we upgraded to a small, discreet soundbar not too long ago.  Need to paint!
 
ANYWAY........just pretend that silly grille is not there! And the burgundy blob has been painted over!  I started with my green stair tread shelf that you can read about here. And three of my favorite plates.


 Added in my pretty bird prints - so cheery, and the perfect colors for this room.


Next I added a metal, bird-topped cloche.  I stuck a cute ceramic chicken and some fall berries inside.


Then a few colorful pitchers.


A few finishing touches - a wooden bird, vintage green mirror, and a few book boxes for height.


I know it won't stay this way for long - I am doing some fall decorating this weekend, but I think it was a nice end of summer display.

I will back soon with the final reveal of our kitchen remodel - a long time coming!

Have a great weekend!

Jane